0%

Shell 脚本 101(2):缺失的代码库

Unix 的优点之一就是允许你根据现有的命令创建出新的程序。尽管 Unix 已经有上百个命令,而且可以通过多种方式来组合他们,但是有时候我们还是会碰到不够用的情况。Perl、Python,甚至 C 都包含了库以提供扩展能力,而 shell 脚本更像是一个自己动手的世界。本章将创建一个基础脚本库,通过它们可以编写出更加复杂的脚本。

POSIX 是什么

编写shell 脚本的一个挑战就是不同 Unix 以及不同 GNU/Linux 发行版之间存在细微差异。IEEE POSIX 标准定义了在不同 Unix 之间需要实现的公共基础功能。POSIX(Portable Operating SystemSystem Interface)是由 IEEE 为 Unix 操作系统定义的一个标准,它规定了什么样的操作系统可以称为 POSIX 兼容 的操作系统,例如 GNU/Linux 就是 POSIX 兼容 的操作系统。但是需要注意,即使是 POSIX 兼容 的操作系统,它们之间也会存在差异。

Script 1:在 PATH 中查找程序

在 shell 脚本中使用环境变量存在一个隐藏的风险:环境变量所指定的程序可能不存在。所以这个脚本将用于测试一个给定的程序是否可以在用户的 PATH 环境变量中找到。

代码

1
2
3
4
5
6
7
8
9
10
11
12
13
14
15
16
17
18
19
20
21
22
23
24
25
26
27
28
29
30
31
32
33
34
35
36
37
38
39
40
41
42
43
44
45
46
47
48
#!/bin/bash

# Copyright (C) fuchencong.com

# inpath:
# verifies that a specified program is either valid as is
# or can be found in the PATH directory list

in_path()
{
# Given a command and the PATH, tries to find the command.
# Returns 0 if found the executable. 1 if not.
# Note that this temporarily modifies the IFS (internal field separator)
# but restores it upon completion

cmd=$1
ourpath=$2
result=1

oldIFS=IFS
IFS=":"

for directory in $ourpath
do
if [ -x $directory/$cmd ]; then
result=0 # if we're here, we found the command
fi
done

IFS=$oldIFS
return $result
}


check_cmd_in_path()
{
var=$1

if [ "$var" != "" ]; then
if [ "${var:0:1}" = "/" ]; then
if [ ! -x $var ]; then
return 1
fi
elif ! in_path $var "$PATH" ; then
return 2
fi
fi
}

原理

check_in_cmd_path() 函数用于检测一个命令是否存在,命令可以仅仅是程序名(例如 echo),也可以是完整的绝对路径(例如 /bin/echo)。这里通过 ${var:0:1} 来获取字符串的第一个字符并判断是否是 /。

${var:offset:length} 是字符串操作语法,用于获取字符串变量 var 从 offset 处开始的长度为 length 的子串。如果没有指定长度,则返回到字符串结尾的所有部分。以下是一个例子:

1
2
3
4
5
$ var="this is a test string..."
$ echo ${var:10}
test string...
$ echo ${var:10:5}
test

对于通过绝对路径指定的命令,直接通过 -x 检测该文件是否存在(同时必须是一个可执行文件),否则传递给 in_path 函数,检查其是否可以在 PATH 环境变量中找到。

运行

为了单独运行该脚本,需要在该文件末尾中添加一些测试代码。如下所示:

1
2
3
4
5
6
7
8
9
10
11
12
13
14
if [ $# -ne 1 ]; then
echo "Usage: $0 command" >&2
exit 1
fi


check_cmd_in_path "$1"
case $? in
0 ) echo "$1 found" ;;
1 ) echo "$1 not found in absolute path" ;;
2 ) echo "$1 not found in PATH" ;;
esac

exit 0

以下展示了该脚本的运行结果:

1
2
3
4
5
6
$ ./inpath.sh echo
echo found
$ ./inpath.sh noecho
noecho not found in PATH
$ ./inpath.sh /bin/noecho
/bin/noecho not found in absolute path

Hacking

如果你想让你的脚本更上去更高级一点,可以将 ${var:0:1} 替换为 ${var%${var#?}},这种字符串操作方法也可以用于获取变量 var 中的第一个字符。这里用到了 bash 中的字符串模式匹配语法:

  • ${var#pattern}:从前往后,删除从字符串开始到匹配 pattern 之间的所有字符,采用最短匹配
  • ${var##pattern}:从前往后,删除从字符串开始到匹配 pattern 之间的所有字符,采用最长匹配
  • ${var%pattern}:从后往前,删除从字符串末尾到匹配 pattern 之间的所有字符,采用最短匹配
  • ${var%%pattern}:从后往前,删除从字符串末尾到匹配 pattern 之间的所有字符,采用最长匹配

pattern 可以采用 bash 中的通配符语法,举个例子:

1
2
3
4
5
6
7
8
$ var="/home/fuchencong/test.file"
$ echo ${var#*/}
home/fuchencong/test.file
$ echo ${var##*/}
test.file
$ echo ${var%/*}
/home/fuchencong
$ echo ${var%%/*}

${var%${var#?}} 包含两个字符串切片操作,内层的 ${var#?} 用于获取去除第一个字符之后的剩余字符串,其中 ? 通配符用于匹配任意一个字符,之后再通过 ${var%${var#?}} 的方式得到第一个字符。

另外也可以通过 $(echo $var | cut -c1) 的方式获取第一个字符。

另外一个技巧是,如果想要脚本单独执行时才运行测试代码,而被其它脚本调用时则不运行测试代码,可以通过 BASH_SOURCE 实现这一点。BASH_SOURCE 是 bash 定义的一个数组,可以认为其维护了脚本调用栈的关系,BASH_SOURCE[0] 是当前脚本的文件名,而 BASH_SOURCE[1] 则是调用者的脚本文件名,依次类推。

可以通过如下语句,判断当前脚本是单独执行,还是被其它脚本调用:

1
if [ "$BASH_SOURCE" = "$0" ]
  • 如果当前脚本是单独执行,则 $BASH_SOURCE 等于 $0,都是表示当前脚本文件名
  • 而如果脚本是被其它脚本执行,则 $BASH_SOURCE 为当前脚本名,而 $0 则是调用者的脚本名
  • 注意,$BASH_SOURCE 等效于 $BASH_SOURCE[0],这是 bash 数组的语法

如果例子展示了 BASH_SOURCE 的相关用法:

1
2
3
4
5
#!/bin/bash

# Copyright (C) fuchencong.com

echo "inner script: \$0=$0, BASH_SOURCE[0]=${BASH_SOURCE[0]}"
1
2
3
4
5
6
7
#!/bin/bash

# Copyright (C) fuchencong.com

echo "Before: outer script: \$0=$0, BASH_SOURCE[0]=${BASH_SOURCE[0]}"
source ./inner.sh
echo "After: outer script: \$0=$0, BASH_SOURCE[0]=${BASH_SOURCE[0]}"
1
2
3
4
$ sh outer.sh
Before: outer script: $0=outer.sh, BASH_SOURCE[0]=outer.sh
inner script: $0=outer.sh, BASH_SOURCE[0]=./inner.sh
After: outer script: $0=outer.sh, BASH_SOURCE[0]=outer.sh

哈哈,BASH_SOURCE 的用法和 Python 中 __name__ 是不是有异曲同工之妙。

Script 2:检查输入,只接受数字和字母

用户的输入可能与脚本预期不符,所以在编写脚本时通常需要检查输入的合法性。如果我们的输入只接受数字和字母,而不可以包括任何标点符号、特殊字符、空格等,可以通过如下脚本进行检验。

代码

1
2
3
4
5
6
7
8
9
10
11
12
13
14
15
16
17
18
19
20
21
22
23
24
25
26
27
28
29
30
31
32
33
34
35
36
37
38
39
40
41
#!/bin/bash

# Copyright (C) fuchencong.com

# valid_alpha_num.sh
# Ensure that input consists only of alphabetical
# and numeric characters


valid_alpha_num()
{
# Validate arg: return 0 if all upper + lower + digits; 1 otherwise

# Remove all unacceptable chars
validchars="$(echo $1 | sed 's/[^[:alnum:]]//g')"

if [ "$validchars" = "$1" ]; then
return 0
else
return 1
fi
}


test()
{
echo -n "Enter input: "
read input

if ! valid_alpha_num "$input"; then
echo "Please enter only letters and numbers." >&2
exit 1
else
echo "Input is valid"
fi
}


if [ "$BASH_SOURCE" = "$0" ]; then
test "$@"
fi

原理

这个脚本最核心的代码是使用 sed 将输入字符串中的所有非法字符去除,然后将去除后的结果和原始字符串进行比较,如果相同,则代表原始字符串不包含非法字符。

这里 sed 使用了 POSIX 正则表达式 [:alphanum] 用于匹配所有字母和数字字符,而 [^[:alphanum:]] 则用于匹配不是字母也不是数字的字符,然后将这些字符替换为空,即达到删除这些字符的效果。

运行

以下展示了这个脚本的运行结果:

1
2
3
4
5
6
7
8
9
10
11
12
13
14
15
16
17
18
19
$ ./valid_alpha_num.sh
Enter input: abcd
Input is valid

$ ./valid_alpha_num.sh
Enter input: 32
Input is valid

$ ./valid_alpha_num.sh
Enter input: 99abc
Input is valid

$ ./valid_alpha_num.sh
Enter input: .abc
Please enter only letters and numbers.

$ ./valid_alpha_num.sh
Enter input: _99a
Please enter only letters and numbers.

Hacking

移除非法字符,然后将移除后的结果与原始字符串进行比较,这种技巧非常灵活。例如如果只接受大写字母,同时也接受空格、逗号和句号,可以编写如下 sed 命令:

1
sed 's/[^[:upper:] ,.]//g'

Script 3:标准化日期格式

开发 shell 脚本的一个问题是数据格式的不一致,而对日期的格式化又最为困难,因为可以通过多种方式指定日期。接下来的脚本将对输入的日期进行格式化。

代码

1
2
3
4
5
6
7
8
9
10
11
12
13
14
15
16
17
18
19
20
21
22
23
24
25
26
27
28
29
30
31
32
33
34
35
36
37
38
39
40
41
42
43
44
45
46
47
48
49
50
51
52
53
54
55
56
57
58
59
60
61
62
63
64
65
#!/bin/bash

# Copyright (C) fuchencong.com

# normalize_date.sh
# Normalizes month field in date specification to three letters,
# first letter capitalized.


month_num_to_name()
{
# Sets the 'month' variable to the appropriate value
case $1 in
1) month="Jan" ;;
2) month="Feb" ;;
3) month="Mar" ;;
4) month="Apr" ;;
5) month="May" ;;
6) month="Jun" ;;
7) month="Jul" ;;
8) month="Aug" ;;
9) month="Sep" ;;
10) month="Oct" ;;
11) month="Nov" ;;
12) month="Dec" ;;
*) echo "$0: Unknown month value $1" >&2
exit 1
esac

return 0
}


test()
{
if [ $# -ne 3 ]; then
echo "Usage: $0 month day year" >&2
echo "Formats are Auguest 3 1962 and 8 3 1962" >&2
exit 1
fi

if [ $3 -le 999 ]; then
echo "$0: expected 4-digit year value." >&2
exit 1
fi

# Is the month input format a number
if [ -z $(echo $1 | sed 's/[[:digit:]]//g') ]; then
month_num_to_name $1
else
month="$(echo $1 | cut -c1 | tr '[:lower:]' '[:upper:]')"
month="$month$(echo $1 | cut -c2-3 | tr '[:upper:]' '[:lower:]')"
fi

echo $month $2 $3
exit 0
}


if [ "$BASH_SOURCE" = "$0" ]; then
test $@
fi


exit 0

原理

这个脚本只能进行简单的格式化,其接受 Month Day Year 形式的输入,可以将数字形式或字符串形式的月份统一转换为三个字符的简写形式,另外年份只能是 4 位数字格式。

通过 [ -z $(echo $1 | sed 's/[[:digit:]]//g') ] 判断输入的月份是否只包含数字。

  • [ -z $string ] 用于判断一个字符串是否为空
  • sed 命令 sed 's/[[:digit:]]//g' 用于删除输入月份中的所有数字
  • 删除所有数字后,如果字符串为空,则代表输入的月份中只包含数字

如果输入的月份只包含数字,则调用 month_num_to_name 将数字形式的月份转换为标准形式。否则则认为输入的是字符串形式的月份,通过 cut 与 tr 命令获取标准形式的输出:

  • 首先获取输入月份中的第 1 个字符,并将其转化为大写形式
  • 然后获取输入月份中的第 2-3 个字符串,并将其转化为小写形式
  • 要获取第一个字符,也可以这种方式实现:${1%${1#?}}

运行

如下展示了这个脚本的运行结果:

1
2
3
4
5
6
$ ./normalize_date.sh 9 21 1993
Sep 21 1993
$ ./normalize_date.sh september 21 1993
Sep 21 1993
$ ./normalize_date.sh Sep 21 1993
Sep 21 1993

Hacking

这个脚本的功能还是比较简单,可以对其进行更多扩展。如果想让脚本可以接收 MM/DD/YYYY 或 MM-DD-YYYY 格式的输入,可以添加如下代码实现:

1
2
3
4
if [ $# -eq 1 ]; then
# to compensate for / or - formats
set -- $(echo $1 | sed 's/[\/\-]/ /g')
fi

如果参数格式只有 1 个,则认为是 MM/DD/YYYY 或 MM-DD-YYYY 格式的输入,然后通过 $(echo $1 | sed 's/[\/\-]/ /g') 将其替换为 3 个以空格分隔的字符串,然后通过 set – 命令重置位置参数,将位置参数重新变换为 month day year 的形式

1
2
3
4
$ ./normalize_date.sh Sep/21/1993
Sep 21 1993
$ ./normalize_date.sh 9/21/1993
Sep 21 1993

Script 4:格式友好地输出大数

对于非常大的数字,可以以更友好的格式进行输出,例如每三位数字之间插入一个逗号。如下脚本实现了该功能。

代码

1
2
3
4
5
6
7
8
9
10
11
12
13
14
15
16
17
18
19
20
21
22
23
24
25
26
27
28
29
30
31
32
33
34
35
36
37
38
39
40
41
42
43
44
45
46
47
48
49
50
51
52
53
54
55
56
57
58
59
60
61
62
63
64
65
66
67
#!/bin/bash

# Copyright (C) fuchencong.com

# nice_number.sh
# Given a number, show it in comma-separated form. Expects DD
# (decimal point delimiter) and TD(thousands delimiter) to be
# instantiated. Instantiates nicenum or, if a second arg is specified,
# the output is echoed to stdout.


nice_number()
{
# Note that we assume that . is the decimal separator in the INPUT value,
# the decimal separator in the output value is "." unless specified by
# the user with the -d flag.

integer=$(echo $1 | cut -d. -f 1)
decimal=$(echo $1 | cut -d. -f 2)

if [ "$decimal" != "$1" ]; then
result="${DD:='.'}$decimal"
fi

thousands=$integer

while [ $thousands -gt 999 ]; do
remainder=$(($thousands % 1000))

# we need 'remainder' to be three digits, maybe need to add zeros
while [ ${#remainder} -lt 3 ]; do
remainder="0$remainder"
done

result="${TD:=','}${remainder}${result}"
thousands=$((thousands / 1000))
done

nicenum="${thousands}${result}"
# check if need to echo nicenum
if [ ! -z $2 ]; then
echo $nicenum
fi
}


DD="." # Decimal point delimiter, to seperate whole and fractional values
TD="," # Thousands delimiter, to separate every digits

while getopts "d:t:" opt; do
case $opt in
d ) DD="$OPTARG" ;;
t ) TD="$OPTARG" ;;
esac
done
shift $(($OPTIND - 1))

# Input validation
if [ $# -eq 0 ]; then
echo "Usage: $(basename $0) [-d c] [-t c] number"
echo " -d specifies the dicimal point delimiter"
echo " -t specifies the thousands delimiter"
exit 0
fi

nice_number $1 1
exit 0

原理

该脚本还是比较复杂的,用到了很多技巧。这个脚本可以接收任意大的数字,包括小数,然后以友好的格式输出该数字,其中以 TD 作为千位分隔符,以 DD 作为小数分隔符。

函数 nice_number() 完成转换的核心逻辑,涉及的 bash 脚本编程知识:

  • cut 命令中通过 -d 选项指定分隔符,通过 -f 获取分隔后的指定字段,如果输入行不包含分隔符,则直接输出原始行
  • ${var:=”value”} 用于实现对变量 var 进行条件赋值。如果变量 var 没有设置或者其值为空,则将 var 赋值为 value,否则 var 仍保留其原始值
  • bash 中可以通过 $(($thousands % 1000)) 的方式执行算术运算

之后脚本的主逻辑中:

  • 通过 getopts 来完成参数的解析,$opt 保存当前解析到的选项,通过 $OPTARG 获取当前选项的参数
  • 完成选项解析后,通过 shift $(($OPTIND-1)) 将选项参数移除,变量 OPTIND 表示当前解析的参数位于参数数组中的下标
  • 之后 $1 即表示要转换的数字

运行

以下展示了该脚本的运行结果:

1
2
3
4
5
6
7
8
$ ./nice_number.sh 100000
100,000
$ ./nice_number.sh 666.888
666.888
$ ./nice_number.sh 66600.888
66,600.888
$ ./nice_number.sh -t _ -d , 6666.888
6_666,888

Hacking

在这个脚本中,默认认为用户输入的数字是以 . 作为小数分隔符的,其实更好的方法是以用户通过 -d 选项所指定的符号最为小数分隔位进行解析:

1
2
integer=$(echo $1 | cut -d"$DD" -f 1)
decimal=$(echo $1 | cut -d"$DD" -f 2)

但是前提是用户的输入的确是采用 $DD 作为小数分隔符,可以再加如下判断:

1
2
3
4
5
separator=$(echo $1 | sed 's/[[:digit]]//g')
if [ ! -z "$separator" -a "$separator" != "$DD" ]; then
echo "$0: Unknown decimal separator $separator encountered." >&2
exit 1
fi

Script 5:检查整数输入

本脚本将检查输入是否是一个合法的整数,可以接受负数。通过如果指定了一个范围,将检查输入是否在范围中。

代码

1
2
3
4
5
6
7
8
9
10
11
12
13
14
15
16
17
18
19
20
21
22
23
24
25
26
27
28
29
30
31
32
33
34
35
36
37
38
39
40
41
42
43
44
45
46
47
48
49
50
51
52
53
54
55
56
57
58
59
60
61
62
63
64
65
66
67
68
69
70
#!/bin/bash

# Copyright (C) fuchencong.com

# valid_integer.sh
# Validates integer input, allowing negative integers too


valid_int()
{
# Validate first field and test the value against min value $2 and/or
# max value $3 if they are supplied. If the value isn't within range
# or it's not composed of just digits, fail.

number="$1"
min="$2"
max="$3"

if [ -z "$number" ]; then
echo "You didn't enter anything. Please enter a number." >&2
return 1
fi

# is the first character a '-' sign
if [ "${number%${number#?}}" = '-' ]; then
test_value="${number#?}"
else
test_value="${number}"
fi

no_digits=$(echo $test_value | sed 's/[[:digit:]]//g')

if [ ! -z "$no_digits" ]; then
echo "Invalid number format! only digits, no commas, spaces, etc." >&2
return 1
fi

if [ ! -z "$min" ]; then
# Is the input less than the minimum value
if [ "$number" -lt "$min" ]; then
echo "Your value is too small: smallest acceptable value is $min." >&2
return 1
fi
fi

if [ ! -z "$max" ]; then
# Is the input greater than the max value
if [ "$number" -gt "$max" ]; then
echo "Your value is too big: largest value is $max." >&2
return 1
fi
fi

return 0
}


test()
{
if valid_int $@ ; then
echo "Input is valid integer within your contraints".
fi

return 0
}


if [ "$BASH_SOURCE" = "$0" ]; then
test $@
fi

原理

该脚本的核心是 valid_int() 函数,其首先检查输入的 number 字符串是否为空。然后判断第一个字符是否为 -,如果是 -,则获取 - 之后的所有字符。然后检查剩余字符是否都为数字,如果不是则代表输入不是合法的整数。之后如果用户传递了 min 或 max,再检查该整数是否在其范围内

其使用到的 bash 脚本编程知识已经在前面的脚本中介绍过了,这里在简单总结一下:

  • 使用 if [ -z “$number” ] 判断 number 变量是否是空字符串
  • 使用 ${number%${number#?}} 获取 number 字符串变量中的第一个字符
  • 使用 ${number#?} 获取去除第一个字符后的剩余所有字符

运行

以下展示了该脚本的运行结果的运行结果:

1
2
3
4
5
6
7
8
9
10
11
12
13
14
15
16
17
$ ./valid_integer.sh 10 0 100
Input is valid integer within your contraints.

$ ./valid_integer.sh 10 50 100
Your value is too small: smallest acceptable value is 50.

$ ./valid_integer.sh 10 0 9
Your value is too big: largest value is 9.

$ ./valid_integer.sh -1 -10 10
Input is valid integer within your contraints.

$ ./valid_integer.sh -1 -20 -10
Your value is too big: largest value is -10.

$ ./valid_integer.sh -30 -20 -10
Your value is too small: smallest acceptable value is -20.

Hacking

注意这个脚本不能使用逻辑 -a 来简化嵌套的 if 表达式,因为 bash 的 -a 不具有短路求值特性。这样可能会执行没有意义的比较。

Script 6:检查浮点数输入

本脚本将对输入的浮点数进行有效性检查,可以把浮点数看成由小数点分割的两个整数,通过前一个脚本 valid_integer.sh 可以简化程序。

代码

1
2
3
4
5
6
7
8
9
10
11
12
13
14
15
16
17
18
19
20
21
22
23
24
25
26
27
28
29
30
31
32
33
34
35
36
37
38
39
40
41
42
43
44
45
46
47
48
49
50
51
52
53
54
55
56
57
58
59
60
61
62
63
64
65
66
67
68
69
70
71
72
73
74
75
76
77
78
79
80
81
82
83
#!/bin/bash

# Copyright (C) fuchencong.com
# valid_float.sh
# Tests whether a number is a valid float-pointing value.
# Note this script can't accept scientific notation.

# To test whether an entered value is valid floating-point number.
# We need to split the value into two parts: the integer portion
# and the fractional portion. We test the first part to see whether
# it's a valid integer, and then we test whether the second part is a
# valid >0 integer. So -30.5 evaluates as valid, but -30.-8 doesn't.


# To include another shell script as a part of this one, use the . source
# notation. Easy enough


. valid_integer.sh


valid_float()
{
fvalue="$1"

# check whether the input number has a decimal point
if [ ! -z $(echo $fvalue | sed 's/[^.]//g') ]; then
# Extract the part before the demical point
demical_part="$(echo $fvalue | cut -d. -f1)"

# Extract the part after the demical point
fractional_part=${fvalue#*\.}

# Start by testing the demical part, which is everything to the left
# of the demical point.
if [ ! -z $demical_part ]; then
if ! valid_int "$demical_part"; then
return 1
fi
fi

# To start, you can't have a negative sign after the demcial point.
if [ "${fractional_part%${fractional_part#?}}" = "-" ]; then
echo "Invalid floating-point number: '-' not allowed after demical point." >&2
return 1
fi

if [ "$fractional_part" != "" ]; then
if ! valid_int "$fractional_part" "0" ""; then
return 1
fi
fi
else
# if the entire value is just "-", that's not good either.
if [ "$fvalue" = "-" ]; then
echo "Invalid floating-point format." >&2
return 1
fi

# finally, check the remaining digits are actually
# valid as integers.
if ! valid_int "$fvalue" "" ""; then
return 1
fi
fi

return 0
}


test()
{
if valid_float $@ ; then
echo "Input is valid float."
fi

return 0
}


if [ "$BASH_SOURCE" = "$0" ]; then
test $@
fi

原理

这个脚本首先检查输入的数字是否包含小数点,如果包含小数点,则分别获取整数部分和小数部分,之后通过 valid_int 函数检查整数部分的有效性,对于小数部分,首先检查其第一个字符不能是 -,之后才可以调用 valid_int 检查小数部分的有效性。如果不包含小数点,则直接调用 valid_int 检查其有效性。

在这个脚本中,所涉及的知识点在前面脚本都提到过,唯一需要注意的是:

  • 通过 source 命令或 . 命令在脚本中包含其他脚本

运行

如下展示了该脚本的运行结果:

1
2
3
4
5
6
7
8
9
10
11
12
$ ./valid_float.sh 10.0
Input is valid float.
$ ./valid_float.sh 0.25
Input is valid float.
$ ./valid_float.sh -10.22
Input is valid float.
$ ./valid_float.sh -10.-22
Invalid floating-point number: '-' not allowed after demical point.
$ ./valid_float.sh -.22
Input is valid float.
$ ./valid_float.sh 1.2ab2
Invalid number format! only digits, no commas, spaces, etc.

Hacking

可以继续扩展该脚本,使其支持科学计数法。其实并不困难,只需要继续识别字符 e 或 E,然后将整个输入划分成 3 部分,每一部分都单独验证其是否是合法的整数。

Script 7: 验证日期格式

Shell 脚本编程中通常需要对用户输入的日期格式进行合法性检测。接下来的脚本将对输入的日期进行合理性检测。

代码

1
2
3
4
5
6
7
8
9
10
11
12
13
14
15
16
17
18
19
20
21
22
23
24
25
26
27
28
29
30
31
32
33
34
35
36
37
38
39
40
41
42
43
44
45
46
47
48
49
50
51
52
53
54
55
56
57
58
59
60
61
62
63
64
65
66
67
68
69
70
71
72
73
74
75
76
77
78
79
80
81
82
83
84
85
86
#!/bin/bash

# Copyright (C) fuchencong.com

# valid_date.sh
# Validates a date, taking into account leap year rules.

normal_date="./normalize_date.sh"

exceed_days_in_month()
{
# Give a month name and day number in that month, this function will return 0
# if the specified day value is less than or equal to the max days in month,
# 1 otherwise

case "$(echo $1 | tr '[:upper:]' '[:lower:]')" in
jan*) days=31 ;;
feb*) days=28 ;;
mar*) days=31 ;;
apr*) days=30 ;;
may*) days=31 ;;
jun*) days=30 ;;
jul*) days=31 ;;
aug*) days=31 ;;
sep*) days=30 ;;
oct*) days=31 ;;
nov*) days=30 ;;
dec*) days=31 ;;
esac

if [ $2 -le 0 -o $2 -gt $days ]; then
return 1
else
return 0
fi
}


is_leap_year()
{
year="$1"

if [ "$((year % 4 ))" -ne 0 ]; then
return 1
elif [ "$((year % 400))" -eq 0 ]; then
return 0
elif [ "$((year % 100))" -eq 0 ]; then
return 1
else
return 0
fi
}


# begin main script
if [ $# -ne 3 ]; then
echo "Usage: $0 month day year" >&2
echo "Typical input formats are Auguest 3 1962 and 8 3 1962" >&2
exit 1
fi

# call normal_date script to normalize date format
new_date="$($normal_date "$@")"
if [ $? -eq 1 ]; then
exit 1
fi

month="$(echo $new_date | cut -d\ -f1)"
day="$(echo $new_date | cut -d\ -f2)"
year="$(echo $new_date | cut -d\ -f3)"

if ! exceed_days_in_month "$month" "$2"; then
if [ "$month" = "Feb" -a "$2" -eq 29 ]; then
if ! is_leap_year "$year"; then
echo "$0: $3 is not a leap year, so Feb doesn't have 29 days." >&2
exit 1
fi
else
echo "$0: bad day value: $month doesn't have $2 days." >&2
exit 1
fi
fi


echo "Valid date: $new_date"
exit 0

原理

该脚本对输入的日期进行合法性检查,检查每个月的天数是否合法,并将闰年的情况考虑进来。exceed_days_in_month 用于根据月份获取天数,函数 is_leap_year 用于判断年份是否是闰年。

脚本首先使用之前的脚本 normalize_date.sh 来对输入的日期进行格式化,然后获取输入的年、月、日。调用 exceed_days_in_month 来检查输入的月份、天数是否合理,如果返回 false,则进一步检查是否是闰年的二月,从而进行特殊处理。

运行

以下是这个脚本的运行结果:

1
2
3
4
5
6
7
8
9
10
11
12
13
14
15
16
17
18
19
20
21
22
23
$ sh valid_date.sh 2 30 2000
valid_date.sh: bad day value: Feb doesn't have 30 days.

$ sh valid_date.sh 2 29 1996
Valid date: Feb 29 1996

$ sh valid_date.sh 2 29 2000
Valid date: Feb 29 2000

$ sh valid_date.sh 2 29 2001
valid_date.sh: 2001 is not a leap year, so Feb doesn't have 29 days.

$ sh valid_date.sh 2 28 2001
Valid date: Feb 28 2001

$ sh valid_date.sh 5 32 2001
valid_date.sh: bad day value: May doesn't have 32 days.

$ sh valid_date.sh 6 31 2001
valid_date.sh: bad day value: Jun doesn't have 31 days.

$ sh valid_date.sh 6 30 2001
Valid date: Jun 30 2001

Hacking

这里介绍一种非常特别的方式来判断某一年是否是闰年:

1
2
3
4
5
6
7
8
9
10
is_leap()
{
year="$1"

if [ $(date -d "12/31/$year" +%j) = "366" ]; then
return 0
else
return 1
fi
}

这里用到了 date 命令,-d 选项用来指定日期,而 +%j 用于输出指定日期在这一年中的天数,这样,如果一年的最后一天是 366,则代表是闰年,否则不是闰年。

Script 8:重新实现 echo

不同 Unix 以及 GNU/Linux 版本对 echo 命令的实现有所不同,例如有的版本支持通过 -n 选项来禁止输出换行符,但有的版本不支持该选项,另外有的版本可以通过 \c 控制符来禁止输出换行符,而有的版本总是输出换行符。

例如,我的 CentOS7 的 echo 命令支持 -n 选项:

1
2
$ echo -n "The rain in Spain"; echo " falls mainly on the Plain"
The rain in Spain falls mainly on the Plain

为了确保脚本中调用的 echo 命令在各个平台上行为一致,将创建 echo 命令的替代版本:命令 echon。其总是禁止输出换行符。

代码

1
2
3
4
5
6
7
8
9
10
11
12
13
14
15
16
17
18
19
20
21
22
23
#!/bin/bash

# Copyright (C) fuchencong.com

# echon.sh
# An alternative version, which always suppress the trailing newline.


echon()
{
echo "$@" | awk '{ printf "%s", $0 }'
}


test()
{
echon "this is a line1"
}


if [ "$BASH_SOURCE" = "$0" ]; then
test "$@"
fi

原理

这个脚本的 echon 函数使用 awk 的 printf 进行输出,其中 $0 代表整个输入行。如果你不想使用 awk 命令,也可以直接使用系统的 printf 命令:

1
2
3
4
echon()
{
printf "%s" "$*"
}

printf 命令总是按照指定格式输出参数,并不会自动添加换行符。

运行

如下是该脚本的运行结果:

1
2
[fuchencong@CentOS7-1 Chapter_01]$ ./echon.sh
this is a line1[fuchencong@CentOS7-1 Chapter_01]$

Hacking

可以的测试你系统 echo 命令处理换行符的行为,例如通过执行 echo -n hi | wc -c,如果返回值是 2,则代表系统的 echo 命令可以识别 -n 选项,不输出换行符。

1
2
[fuchencong@CentOS7-1 Chapter_01]$ echo -n hi | wc -c
2

Script 9:任意精度的浮点数运算

在 Bash 脚本中通常使用 $(()) 进行算术运算,该表达式支持加、减、乘、除、求余等基本算术操作。但是其仅支持整型操作,不支持浮点数运算。如果想要进行浮点数运算,可以使用 bc 命令,bc 提供任意精度的浮点数运算,本脚本将对 bc 命令进行简单的包装。

代码

1
2
3
4
5
6
7
8
9
10
11
12
13
14
15
16
17
18
19
20
21
22
23
24
#!/bin/bash

# Copyright (C) fuchencong.com

# scriptbc.sh
# Wrapper for 'bc' than returns the result of a caculation


if [ "$1" = "-p" ]; then
precision=$2
shift 2
else
precision=2 #default
fi


bc -q -l << EOF
scale=$precision
$*
quit
EOF


exit 0

原理

这个脚本只是对 bc 命令进行简单地包装。首先该脚本支持通过 -p 选项设置运算精度,如果没有指定精度,则默认为 2。之后调用 bc 命令进行运算,bc 命令从标准输入中读取数据进行运算。

这个脚本中,通过 << 来包含输入,在 EOF 之间的所有内容都被传入 bc 命令,就好像是从标准输入中读取的一样。这种语法称为 HERE 文档。这里不一定要使用 EOF 字符串,可以使用任意字符串,只需要保证前后一致即可。

bc 命令默认精度为 0,因此其工作方式和 $(()) 一致。可以通过 scale=value 的方式设置精度。另外,bc 的 -q 选项用于启动时不打印信息,-l 用于定义标准数学库。

$* 表示所有命令行参数,这里就是把输入参数传入 bc 命令进行运算,最后通过 quit 退出 bc。

运行

以下展示了这个脚本的运行结果:

1
2
3
4
5
6
$ ./scriptbc.sh 10 / 2
5.00
$ ./scriptbc.sh -p 5 10 / 2
5.00000
$ ./scriptbc.sh -p 3 10 / 3
3.333

Hacking

该脚本主要是对 bc 命令进行包装,bc 命令从标准输入中读取数据进行运算,这里通过 HERE 文档 的方式将命令行参数转换为 bc 命令的输入数据。

Script 10:对文件上锁

当一个脚本尝试读取或者修改文件时,最好对该文件上锁,这样就可以避免其他脚本同时操作该文件。对文件上锁最常用的方法是创建一个独立的 lock file。该 lock file 充当信号量的作用,用于表示所保护的文件是否正在被其它进程使用。

但是这并不容易,例如如下的方案无法解决这个问题:

1
2
3
4
while [ -f $lockfile ]; do
sleep 1
done
touch $lockfile

这段代码不停循环检测 lockfile 是否存在,如果 lockfile 存在则代表其它脚本正在使用所保护的文件,如果不存在,则可以安心地使用所保护的文件,并创建 lockfile,使用完毕之后再删除 lockfile。

稍微了解多线程编程知识就应该明白这样做是会出问题的,现代操作系统都支持多道程序设计,检查 lockfile 和创建 lockfile 并不是一个原子操作,如果有多个脚本同时运行并竞争 lockfile 时,此时可能会出现同步问题。

现在很多 Unix 版本,包括 GNU/Linux 都支持一个命令行工具:lockfile,可以让你安全可靠地在 shell 脚本中对文件加锁。如果你的系统中没有 lockfile 命令,可以安装 procmail 软件包:

1
yum -y install procmail

如下脚本是对 lockfile 的简单包装,简化 lockfile 的使用。

代码

1
2
3
4
5
6
7
8
9
10
11
12
13
14
15
16
17
18
19
20
21
22
23
24
25
26
27
28
29
30
31
32
33
34
35
36
37
38
39
40
41
42
43
44
45
46
47
#!/bin/bash

# Copyright (C) fuchencong.com

# filelock
# A flexible file-locking mechanism

retries="10"
action="lock"
nullcmd="which true"

while getopts "lur:" opt; do
case $opt in
l ) action="lock" ;;
u ) action="unlock" ;;
r ) retries="$OPTARG" ;;
esac
done
shift $(($OPTIND - 1))


if [ $# -eq 0 ]; then
cat << EOF
Usage: $0 [-l|-u] [-r retries] LOCKFILE
Where -l request a lock(the default), -u request an unlock, -r X
specifies a max number of retries before it fails (default= $retries).
EOF
exit 1
fi

if [ -z "$(which lockfile | grep -v '^no ')" ]; then
echo "$0 failed: 'lockfile' utility not found in PATH." >&2
exit 1
fi

if [ "$action" = "lock" ]; then
if ! lockfile -r "$retries" "$1" 2> /dev/null; then
echo "$0: Failed: Couldn't create lockfile in $retries times." >&2
exit 1
fi
else
if [ ! -f "$1" ]; then
echo "$0: Warning: lockfile $1 doesn't exit to unlock." >&2
fi
rm -f "$1"
fi
exit 0

原理

这个脚本最核心的就是使用 lockfile 命令来锁文件。如果 lockfile 无法创建指定的锁文件,它会等待一段时间(默认为 8 s)然后继续尝试。可以通过 -r 选项指定尝试次数,如果达到了指定重试次数仍然无法创建成功,则 lockfile 返回失败。在这个脚本中,如果是加锁,则使用 lockfile 命令创建锁文件,如果是解锁,则调用 rm 命令删除锁文件。

其他涉及的知识已经在前面的脚本介绍过:

  • 使用 getopt 命令完成命令行参数解析
  • 使用 HERE 文档将脚本中的字符串转化为 cat 命令的标准输入

运行

如下展示了这个脚本的运行结果:

1
2
3
4
5
6
7
8
9
10
11
12
13
$ ./filelock.sh -l test.lock

$ ls -l test.lock
-r--r--r--. 1 fuchencong fuchencong 1 May 11 15:02 test.lock

$ ./filelock.sh -l test.lock
./filelock.sh: Failed: Couldn't create lockfile in 10 times.

$ ./filelock.sh -u test.lock
$ ls -l test.lock
ls: cannot access test.lock: No such file or directory

$ ./filelock.sh -l test.lock

可以看到,第一次成功创建锁文件 test.lock,之后再次创建该锁文件,则脚本被阻塞,直到 10 次尝试失败打印错误消息。而解锁之后,test.lock 则被删除,再次创建该锁文件则直接成功。

Hacking

在使用 lockfile 命令时最好通过 -l 选项来指定最长锁定时间,这样可以避免某个脚本在加锁之后忘记解锁,而造成其他脚本永远无法加锁成功。

Script 11:ANSI 颜色序列

大多数终端应用程序支持不同的风格来表现文本,例如可以让某些文本使用粗体、或者红色显示。但是,在使用 ANSI(American National Standards Institute)序列来控制文本的风格时,会有点困难,因为这些控制字符串对程序员而言并不友好,本脚本将会简化这些控制字符串的使用。

代码

1
2
3
4
5
6
7
8
9
10
11
12
13
14
15
16
17
18
19
20
21
22
23
24
25
26
27
28
29
30
31
32
33
34
35
36
37
38
39
40
41
42
43
44
45
46
47
48
49
50
51
52
53
54
55
56
57
58
59
60
61
62
63
64
65
66
67
#!/bin/bash

# Copyright (C) fuchencong.com

# ansi_color.sh
# Use these variables to make output in different colors and formats.
# Color names that end with f are foreground colors, and those ending
# with 'b' are background colors.


initialize_ansi()
{
esc='\033'

# Foreground colors
blackf="${esc}[30m"
yellowf="${esc}[33m"
cyanf="${esc}[36m"
redf="${esc}[31m"
greenf="${esc}[32m"
bluef="${esc}[34m"
purplef="${esc}[35m"
whitef="${esc}[37m"

# Background colors
blackb="${esc}[40m"
yellowb="${esc}[43m"
cyanb="${esc}[46m"
redb="${esc}[41m"
greenb="${esc}[42m"
blueb="${esc}[44m"
purpleb="${esc}[45m"
whiteb="${esc}[47m"

# Bold, italic, underline, and inverse style toggles
boldon="${esc}[1m"
boldoff="${esc}[22m"
italicson="${esc}[3m"
italicsoff="${esc}[23m"
ulon="${esc}[4m"
uloff="${esc}[24m"
invon="${esc}[7m"
invoff="${esc}[27m"

reset="${esc}[0m"
}


test()
{
initialize_ansi

str="
${yellowf}This is a phrase in yellow${redb} and red${reset}
${boldon}This is bold${ulon} this is italics${reset} bye-bye
${italicson}This is italics${italicsoff} and this is not
${ulon}This is ul${uloff} and this is not
${invon}This is inv${invoff} and this is not
${yellowf}${redb}Warning I ${yellowb}${redf}Warning II${reset}
"
echo -e "$str"
}


if [ "$BASH_SOURCE" = "$0" ]; then
test $@
fi

原理

这个脚本在函数 initialize_ansi 中定义了许多变量,这些变量的值就是各种 ANSI 控制序列,之后就可以直接使用这些变量来控制文本的格式,这简化了对 ANSI 控制序列的使用。

在这些变量中,可以进行效果叠加,也可以通过 on/off 进行 开启/关闭,而所有格式都可以通过 reset 进行清除。

另外,在使用输出命令时,需要该命令支持 ANSI 控制序列才能得到相应的输出效果,例如使用 echo 时需要使用 -e 选项。

运行

如下展示了这个脚本的运行结果:

Hacking

这个脚本的输出还需要你的终端支持 ANSI 序列。

Script 12:构建一个 Shell 脚本库

本章中的很多脚本都被编写成函数形式,而不是一个独立运行的程序,这样这些脚本就可以轻易地被集成到其他脚本中使用。在脚本中包含其他脚本,和在脚本中调用其他脚本是不一样的。如下展示了一个重要区别:

1
2
3
4
5
6
$ echo "test=2" >> tinyscript.sh
$ chmod +x tinyscript.sh
$ test=1
$ ./tinyscript.sh
$ echo $test
1

因为是在一个子 shell 中运行 tinyscript.sh,所以当前 shell 环境中的 test 变量并没有修改。但是如果使用 . 或 source 命令来包含 tinyscript.sh,这就如同将 tinyscript.sh 中的命令直接输入当前 shell 中执行:

1
2
3
$ source tinyscript.sh
$ echo $test
2

接下来将本章所编写的几个功能函数以及所需的全局变量都包含到 library.sh,然后在一个示例脚本中使用这个库文件。

代码

1
2
3
4
5
6
7
8
9
10
11
12
13
14
15
16
17
18
19
20
21
22
23
24
25
26
27
28
29
30
31
32
33
34
35
36
37
38
39
40
41
42
43
44
45
46
47
48
49
50
51
52
53
54
55
56
57
58
59
60
61
62
63
64
65
66
67
68
69
70
71
72
73
74
75
76
77
78
79
80
81
82
83
84
85
86
87
88
89
90
91
92
93
94
95
96
97
98
99
100
101
102
103
104
105
106
107
108
109
110
111
112
113
114
115
116
117
118
119
120
121
122
123
124
125
126
127
128
129
130
131
132
133
134
135
136
137
138
139
140
141
142
143
144
145
146
147
148
149
150
151
152
153
154
155
156
157
#!/bin/bash

# Copyright (C) fuchencong.com

# library.sh
# include all tool functions


initialize_ansi()
{
esc='\033'

# Foreground colors
blackf="${esc}[30m"
yellowf="${esc}[33m"
cyanf="${esc}[36m"
redf="${esc}[31m"
greenf="${esc}[32m"
bluef="${esc}[34m"
purplef="${esc}[35m"
whitef="${esc}[37m"

# Background colors
blackb="${esc}[40m"
yellowb="${esc}[43m"
cyanb="${esc}[46m"
redb="${esc}[41m"
greenb="${esc}[42m"
blueb="${esc}[44m"
purpleb="${esc}[45m"
whiteb="${esc}[47m"

# Bold, italic, underline, and inverse style toggles
boldon="${esc}[1m"
boldoff="${esc}[22m"
italicson="${esc}[3m"
italicsoff="${esc}[23m"
ulon="${esc}[4m"
uloff="${esc}[24m"
invon="${esc}[7m"
invoff="${esc}[27m"

reset="${esc}[0m"
}


echon()
{
echo "$@" | awk '{ printf "%s", $0 }'
}


in_path()
{
# Given a command and the PATH, tries to find the command.
# Returns 0 if found the executable. 1 if not.
# Note that this temporarily modifies the IFS (internal field separator)
# but restores it upon completion

cmd=$1
ourpath=$2
result=1

oldIFS=IFS
IFS=":"

for directory in $ourpath
do
if [ -x $directory/$cmd ]; then
result=0 # if we're here, we found the command
fi
done

IFS=$oldIFS
return $result
}


check_cmd_in_path()
{
var=$1

if [ "$var" != "" ]; then
if [ "${var:0:1}" = "/" ]; then
if [ ! -x $var ]; then
return 1
fi
elif ! in_path $var "$PATH" ; then
return 2
fi
fi
}


valid_int()
{
# Validate first field and test the value against min value $2 and/or
# max value $3 if they are supplied. If the value isn't within range
# or it's not composed of just digits, fail.

number="$1"
min="$2"
max="$3"

if [ -z "$number" ]; then
echo "You didn't enter anything. Please enter a number." >&2
return 1
fi

# is the first character a '-' sign
if [ "${number%${number#?}}" = '-' ]; then
test_value="${number#?}"
else
test_value="${number}"
fi

no_digits=$(echo $test_value | sed 's/[[:digit:]]//g')

if [ ! -z "$no_digits" ]; then
echo "Invalid number format! only digits, no commas, spaces, etc." >&2
return 1
fi

if [ ! -z "$min" ]; then
# Is the input less than the minimum value
if [ "$number" -lt "$min" ]; then
echo "Your value is too small: smallest acceptable value is $min." >&2
return 1
fi
fi

if [ ! -z "$max" ]; then
# Is the input greater than the max value
if [ "$number" -gt "$max" ]; then
echo "Your value is too big: largest value is $max." >&2
return 1
fi
fi

return 0
}


is_leap_year()
{
year="$1"

if [ "$((year % 4 ))" -ne 0 ]; then
return 1
elif [ "$((year % 400))" -eq 0 ]; then
return 0
elif [ "$((year % 100))" -eq 0 ]; then
return 1
else
return 0
fi
}
1
2
3
4
5
6
7
8
9
10
11
12
13
14
15
16
17
18
19
20
21
22
23
24
25
26
27
28
29
30
31
32
33
34
35
36
37
38
39
40
41
42
43
44
45
#!/bin/bash

# Copyright (C) fuchencong.com

# use_library.sh
# test library.sh

. library.sh


# set up all those ANSI escape sequences.
initialize_ansi

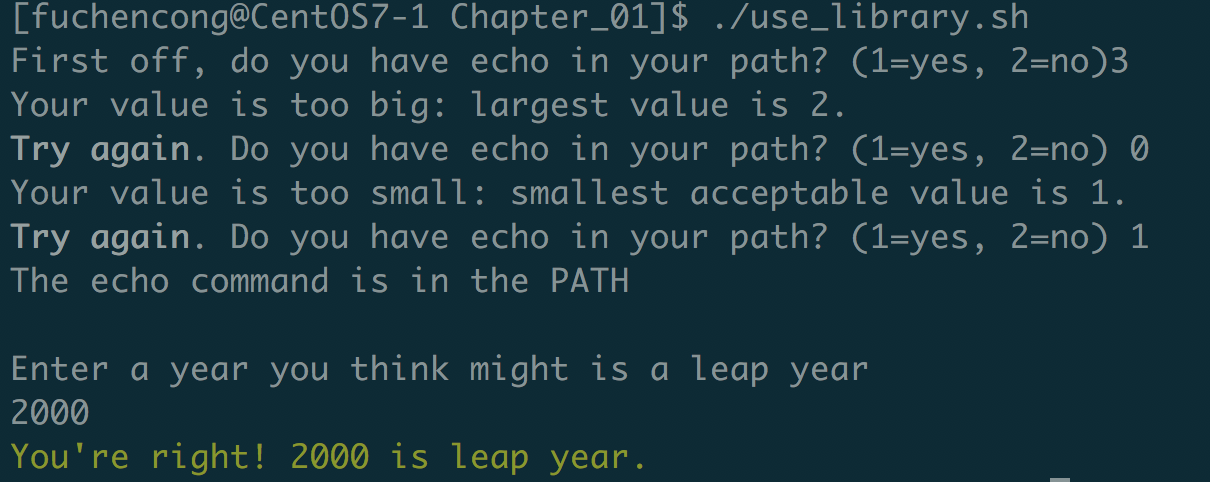
echon "First off, do you have echo in your path? (1=yes, 2=no)"
read answer

while ! valid_int $answer 1 2; do
echon -e "${boldon}Try again${boldoff}. Do you have echo "
echon -e "in your path? (1=yes, 2=no) "
read answer
done

# check echo if in PATH
if ! check_cmd_in_path "echo"; then
echo "Nope, can't find the echo command"
else
echo "The echo command is in the PATH"
fi

echo ""
echo "Enter a year you think might is a leap year"
read year

while ! valid_int $year 1 9999; do
echon -e "Please enter a year in the ${boldon}correct${boldoff} format:"
read year
done

if is_leap_year $year; then
echo -e "${greenf}You're right! $year is leap year.${reset}"
else
echo -e "${redf}Nope! $year is not a leap year.${reset}"
fi

exit 0

原理

use_library.sh 脚本首先使用 . 命令包含 library.sh,这样就可以在这个脚本中使用 library.sh 中的各个函数了。

运行

如下展示了这个脚本的运行结果:

Hacking

可以不停拓展 library.sh,这样就可以构建出自己的脚本库文件,简化后续脚本的编写。

Script 13:调试 Shell 脚本

这一节将介绍一些基本的 Shell 脚本调试技巧。首先最好的调试策略就是增量构建 Shell 脚本。另外,可以充分使用 echo 命令来跟踪变量,也可以使用 bash -x 来打印调试结果。例如:

1
bash -x test.sh

或者也可以使用 set -x 打开 bash 的调试选项,之后再使用 set +x 关闭调试开关。

1
2
3
$ set -x
$ ./test.sh
$ set +x

代码

以下展示了一个猜数字游戏的简单脚本:

1
2
3
4
5
6
7
8
9
10
11
12
13
14
15
16
17
18
19
20
21
22
23
24
25
26
27
28
29
#!/bin/bash

# guess_number.sh
# A simple guess number game

biggest=100
guess=0
guesses=0


# Random number, between 1 and $biggest
number=$(( $$ % $biggest ))
echo "Guess a number between 1 and $biggest"

while [ "$guess" -ne "$number" ]; do
/bin/echo -n "Guess? ";
read guess
if [ "$guess" -lt "$number" ]; then
echo "...smaller"
elif [ "$guess" -gt "$number" ]; then
echo "...bigger"
fi
guesses=$(( $guesses + 1 ))
done

echo "Rignt!! Guessed $number in $guesses guesses."


exit 0

原理

这个脚本唯一需要注意的是使用 $$ 来获得一个随机数,在 bash 脚本中,$$ 是当前进程的 ID,即运行当前脚本的进程 ID。每次运行脚本,进程 ID 是不同的,从而间接得到一个随机数。

另外一种获取随机数的方法是使用环境变量 $RANDOM,例如如果要获取 1 - 100 之间的随机数,可以通过如下方式:

1
2
3
4
5
6
7
8
$ echo $(( $RANDOM % 100 + 1 ))
28
$ echo $(( $RANDOM % 100 + 1 ))
24
$ echo $(( $RANDOM % 100 + 1 ))
76
$ echo $(( $RANDOM % 100 + 1 ))
26

运行

以下展示了这个脚本的运行结果:

1
2
3
4
5
6
7
8
9
10
11
12
13
14
15
16
17
18
$ ./guess_number.sh
Guess a number between 1 and 100
Guess? 50
...bigger
Guess? 25
...smaller
Guess? 32
...smaller
Guess? 40
...smaller
Guess? 45
...smaller
Guess? 48
...bigger
Guess? 46
...smaller
Guess? 47
Rignt!! Guessed 47 in 8 guesses.

Hacking

在编写脚本时,通常碰到的一个语法错误是双引号没有成对出现,这里提供一个小技巧,快速找到这类语法错误:

1
2
3
4
5
6
$ sh guess_number.sh
Guess a number between 1 and 100
guess_number.sh: line 26: unexpected EOF while looking for matching `"'
guess_number.sh: line 30: syntax error: unexpected end of file
$ grep '"' guess_number.sh | egrep -v '.*".*".*'
echo "...bigger