context 包定义了 Context 类型,通过该类型可以实现在不同流程间设置 deadline、通知取消信号、设置每请求关联值等功能。context 包简化了 Go 并发编程中不同 API/流程间的信息传递(取消信号、超时信号、每请求关联数据等都可以认为是要传递的信息)。
这篇文章主要介绍 context 包的使用及内部原理。
context 库简介
context 包最基本的使用逻辑是:服务器收到请求后应该创建一个 Context,之后发起后续调用时都应该将 Context 作为参数进行传递,而且整个函数调用链都需要传递 Context。传递的 Context 可以是同一个,也可以是通过 WithCancel、WithDeadline、WithTimeout、WithValue 等函数创建的子 Context。当某个 Contex 取消后,它的所有子 Context 也会被取消。
context 包的基本原理
context 包定义了 Context 这个接口类型,它的定义如下:
1 | type Context interface { |
Deadline()方法用于返回该 Context 的截止时间。如果ok返回值为 false,则表示该 Context 没有设置 deadlineDone()方法返回一个 channel,当 Context 被取消时,该函数所返回的 channel 就会被关闭。如果该 Context 无法被取消,则 Done() 返回 nilErr()方法返回该 Context 的错误状态信息- 如果
Done()所返回的 channel 还没有关闭,则返回 nil - 如果
Done()所返回的 channel 已经关闭,则返回一个非 nil 的错误信息。其中Canceled表示该 Context 是被取消,DeadlineExceeded表示已经到达截止时间
- 如果
Value()方法返回该 Context 上指定 key 所关联的值。通过该方法可以实现每请求关联值功能
所有的具体 Context 类型都需要实现上述接口类型。
Background()/TODO()
在收到请求时,我们需要创建一个 Root Context,或者称为顶级 Context。可以通过 Backgroud() 函数创建这个 Root Context。该 Context 其实没有任何功能,它不能被取消、没有 deadline、也不带任何值信息,它的主要作用就是作为整个 Context 树的根节点。
我们从 Background 及其相关实现也可以确认这一点:
1 | type backgroundCtx struct{ emptyCtx } |
下面是 Background() 的一个测试用例,由于其 Done() 函数返回的 channel 是 nil,所以正确情况下 由于 <-c.Done() 应该会被阻塞,因此 select 选择 default 分支。
1 | func TestBackground(t *testing.T) { |
TODO() 函数返回的 Context 其实和 Background() 的返回值底层类型是一样的,只不过 TODO() 函数的名字提示我们,在不知道使用什么 Context 时,可以先使用 TODO() 函数返回的 Context 作为一个占位符。
1 | type todoCtx struct{ emptyCtx } |
WithCancel()
WithCancel() 创建一个可手动取消的 Context。该函数接受一个 Context 参数作为父 Context,并返回一个新的 Context 以及一个 cancel 函数。通过调用该 cancel 函数,可以手动取消该新的 Context。另外如果 parent Context 被取消了,那么该子 Context 也会被取消(取消信号会沿着 Context 树一直传递下去)。Context 被取消之后,都可以通过 Context->Done() 函数的返回 channel 得到通知。
1 | type CancelFunc func() |
所以 Cancel Context 的基本用法是:
Cancel Context的生产者通过调用 cancel 函数来向Cancel Context的消费者通知取消信号Cancel Context的消费者通过Context->Done()函数返回的 channel 来接收取消信号
如下测试代码展示了 WithCancel() 的基本用法:
1 | package main |
1 | # go run main.go |
可以看到,在调用 c1 的 cancel 函授后,它的子孙 Context 都自动被取消了。
WithCancelCause 函数类似于 WithCancel 函数,但是它返回的取消函数类型为 CancelCauseFunc,而不是 CancelFunc。调用该类型的 cancel 函数时可以传递一个 error 参数用于记录 Context 取消的原因。之后可以通过 Cause(ctx) 获取取消原因。如果调用 cancel 函数时 error 参数设置为 nil,则 Cause(ctx) 返回默认值 Canceled。
1 | type CancelCauseFunc func(cause error) |
WithDeadline()
WithDeadline() 函数创建一个具有 deadline 时间的 Context。该函数接受一个 Context 参数作为父 Context,并返回一个新的 Context 以及一个 cancel 函数。在如下任意时机,该 Context 的 Done() 函数所返回的 channel 都会得到通知:
- 手动调用返回的 cancel 函数
- 到达了 deadline 所指定的时间
- parent Context 的
Done()函数所返回的 channel 被关闭
值得注意是,如果 parent Context 本身也有 deadline,且 parent 的 deadline 时间早于 WithDeadline() 函数中所指定的 deadline 时间,那么 WithDeadline(parent, deadline) 函数中所指定的新 deadline 没有作用,其创建的 Context 等同于 WithCancel(parent) 所创建的 context(内部也是这样实现的)。
WithDeadlineCause() 函数类似于 WithDeadline() 函数,但是它额外接收一个 error 类型的 cause 参数用于设置 deadline 超时后的原因。返回的 cancel 函数则不能设置 cause。
1 | func WithDeadlineCause(parent Context, d time.Time, cause error) (Context, CancelFunc) |
WithTimeout()
WithTimeout() 也是创建一个具有超时功能的、可取消 Context,但该函数是通过 time.Duration 类型的参数来设置超时时间:
1 | func WithTimeout(parent Context, timeout time.Duration) (Context, CancelFunc) |
WithTimeout(parent, timeout) 函数实际上等价于 WithDeadline(parent, time.Now().Add(timeout))。因此该函数返回的 Context 在功能特性上也和 WithDeadline() 返回的 Context 完全一致,这里就不再赘述。
WithTimeoutCause() 函数类似于 WithTimeout() 函数,但是它额外接收一个 error 类型的 cause 参数用于设置超时原因。返回的 cancel 函数不能则设置 cause。
AfterFunc()
AfterFunc() 函数可以提供更高级的功能,当所指定的 ctx 完成后(手动取消或者超时取消),它可以在独立的 goroutine 中执行指定的函数 f():
1 | func AfterFunc(ctx Context, f func()) (stop func() bool) |
AfterFunc() 返回一个 stop 函数,通过该函数可以取消 ctx 与 f 的关联。调用 stop 函数后:
- 如果返回值为 true,表示成功取消
ctx与f的关联,f 函数不会有运行时机 - 如果返回值为 false,则表示 ctx 已经 done,f 函数已经开始运行;或者
ctx和f已经没有关联联系了
context 包的使用规范
根据标准库建议,应用程序在使用 context 包时应该遵循以下规则,这样能保证不同 go package 间接口的一致性、也可以让静态分析工具检查 context 的传播是否正确:
- 不要在结构体类型中保存 Context,而应该显式将 Context 作为函数参数传递给每个需要它的函数。Context 应该作为第一个参数,通常命名为 ctx
1 | func DoSomething(ctx context.Context, arg Arg) error { |
- 不要传递 nil Context,即使函数允许该参数值。当不确定使用哪一个 Context 时,可以先试用
context.TODO() - 仅将
Value Context用于在 API 间传递每请求关联值,不要将它用作传递函数的可选参数 - 同一个 Context 可以传递到运行在不同 goroutine 的函数里,Context 对于多个 goroutine 同时使用是安全的
context 包的实现原理
接下来介绍 context 包的代码实现原理。下图展示了 context 包中的的核心数据结构定义:
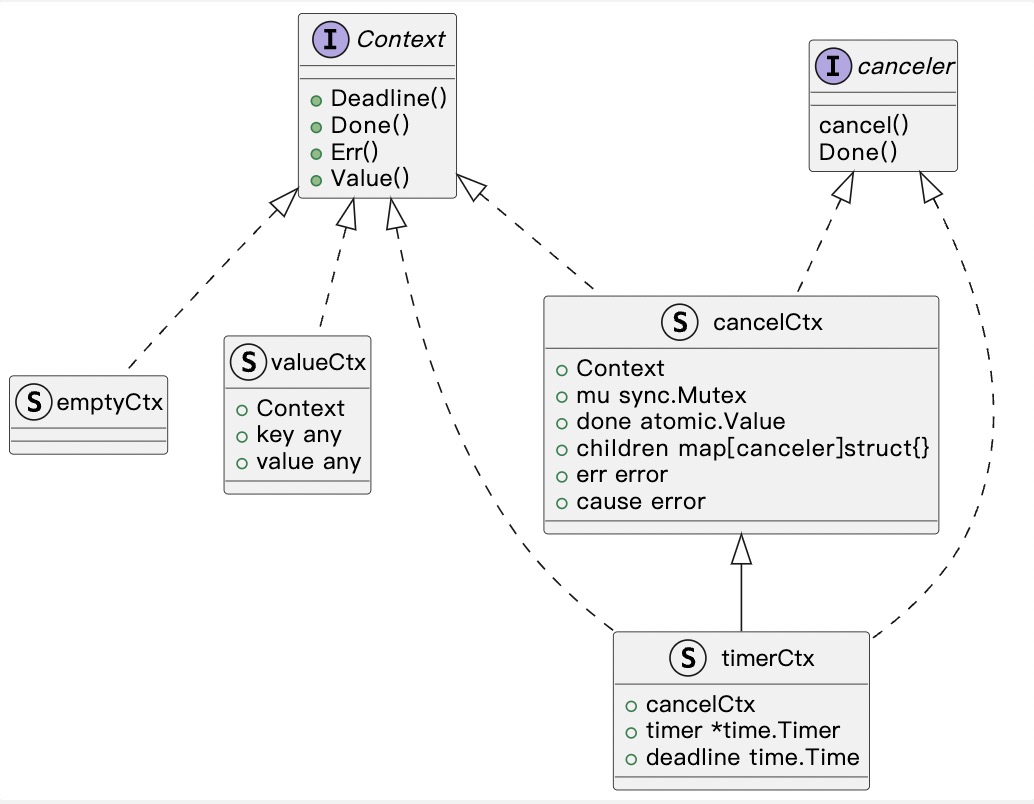
Context接口类型对Context 功能进行了统一抽象,所有具体的 Context 类型都会实现该接口emptyCtx是一种 dummy Context 类型,Background()和TODO()函数返回的 Context 都是基于emptyCtx{}类型实现的WithCancel函数返回的 Context 类型就是cancelCtx,它实现了可取消 Context 功能WithDeadline和WithTimeout函数返回的 Context 类型都是timerCtx,它实现了具有超时时间的、可取消 Context。从timerCtx结构的定义也可以看出,其通过内嵌cancelCtx类型来实现 cancel 相关功能cancelCtx和timerCtx都实现了 canceler 接口
valueCtx
WithValue() 函数创建的 Context 类型就是 valueCtx,它自己实现了 Value() 方法以提供 每请求关联值 的功能,而将其他方法的实现都委托给了其父 Context。valueCtx 的定义如下:
1 | type valueCtx struct { |
其 Value() 方法的实现如下,其核心逻辑是判断待查找的 key 和当前 valueCtx 的 key 是否相等。如果相等,则返回所对应的 val,否则会沿着 Context 树一直向上对其父 Context 进行 key 查找,直到查找成功或者遇到根节点。
1 | // valueCtx 实现的 Value 方法 |
正是由于这种向上递归查找特性,使得 valueCtx 携带的 key-value 键值对呈现出了一种 继承 特征,即可以通过后代 Context 查找其祖先 Context 中携带的 key-value 键值对。如下是一个示例:
1 | package main |
1 | # go run main.go |
可以看到,即使整个 Context 树中除了包含 valueCtx 类型,还存在 cancelCtx 类型、自定义 Context 类型,整个 key-value 键值对的查找仍能正常进行。
cancelCtx/timerCtx
cancelCtx/timerCtx 都是可取消 Context。cancelCtx 可通过 cancel() 函数手动通知取消信号,而 timerCtx 除了可以手动取消外,在超时之后也会自动通知取消信号。这点重点介绍 canctlCtx 是如何实现取消功能的。
当一个 cancelCtx 被取消时,我们不仅需要关闭其 Done() 方法返回的 channel,还需要向下沿着 Context 将其所有子孙 Context 都取消。cancelCtx 通过如下两种方式来实现该特性的:
- 如果 parent 本身是通过
WithCancel()/WithTimeout()等创建的*cancelCtx类型(或者可以完全转换为一个*cancelCtx类型,但没有重新实现Done()方法),那么就在 parent cancelCtx 的children字段中记录其所有可取消的子 Context。这样当 parent 被取消后,只需要遍历 children 中的所有可取消 Context,调用其cancel()方法即可 - 否则其他情况(例如完全自定义的 Context 类型)下,就会额外创建一个 goroutine 来监控 parent 的
Done()channel,这样当 parent 被取消时,触发自己的取消流程
上述逻辑的实现是在 propagateCancel() 函数中实现的。该函数通过 parentCancelCtx() 判断其 parent 是否为 cancelCtx 类型(或者可以完全转换为一个 *cancelCtx 类型):
1 | // cancelCtx 的 Value 函数实现 |
propagateCancel() 之所以要分两种情况来处理,就是为了尽量减少 goroutine 的创建。接下来再看 cancelCtx 是如何取消的,其核心逻辑位于 cancelCtx.cancel() 方法中:
1 | func (c *cancelCtx) cancel(removeFromParent bool, err, cause error) { |
明白了 cancelCtx 的实现原理之后,timerCtx 的实现就非常简单了。因为其本身就通过内嵌 cancelCtx 类型来实现取消功能,只不过 tiemrCtx 在创建时会额外启动一个定时器,在指定的时间超时后自动取消自己:
1 | func WithDeadlineCause(parent Context, d time.Time, cause error) (Context, CancelFunc) { |
总结
context 包的源码虽然不多,但是其实现还是非常精巧的,还需要多用、多看,才能深入掌握 context 包的设计思想及实现原理。