这篇文章我们将快速学习 ent 库,ent 是一个简单而又功能强大的 Go 语言实体框架,易于构建和维护应用程序与大数据模型。我们将通过一个实际例子来入门 ent 的使用,核心材料来自于 ent 的官方文档 。
ent 是一个简单而强大的 Go 实体框架,可以轻松构建和维护具有大型数据模型的应用程序,并遵循以下原则:
轻松地将数据库 Schema 建模为图结构。
将 Schema 定义为可编程的 Go 代码。
基于代码生成的静态类型。
数据库查询和图遍历易于编写。
使用 Go 模板轻松扩展和自定义。
ent 遵循以下设计理念:
图就是代码 - 将任何数据库表建模为 Go 对象
轻松地遍历任何图形 - 可以轻松地运行查询、聚合和遍历任何图形结构
静态类型和显式API - 使用代码生成静态类型和显式API,查询数据更加便捷
多存储驱动程序 - 支持MySQL, PostgreSQL, SQLite 和 Gremlin
可扩展 - 简单地扩展和使用 Go 模板自定义
首先我们准备好一个 Go 项目:
1 2 3 4 go: creating new go.mod: module entdemo
在项目的根目录,运行:
1 2 go: finding module for package entgo.io/ent/cmd/ent
上面的命令将在 ent/schema/ 目录下生成 User 的 Schema:
1 2 3 4 5 6 7 8 9 10 11 12 13 14 15 16 17 18 19 20 21 package schemaimport "entgo.io/ent" type User struct { ent.Schema } func (User) return nil } func (User) return nil }
接下来向 User Schema 添加 2 个字段:
1 2 3 4 5 6 7 8 9 func (User) return []ent.Field{ field.Int("age" ). Positive(), field.String("name" ). Default("unknown" ), } }
从项目根目录运行 go generate,如下:
该命令将生成如下文件:
1 2 3 4 5 6 7 8 9 10 11 12 13 14 15 16 17 18 19 20 total 124 -rw-r--r-- 1 root root 9797 Jun 12 11:43 client.go -rw-r--r-- 1 root root 16021 Jun 12 11:43 ent.go drwxr-xr-x 2 root root 4096 Jun 12 11:43 enttest -rw-r--r-- 1 root root 82 Jun 12 11:37 generate.go drwxr-xr-x 2 root root 4096 Jun 12 11:43 hook drwxr-xr-x 2 root root 4096 Jun 12 11:43 migrate -rw-r--r-- 1 root root 12281 Jun 12 11:43 mutation.go drwxr-xr-x 2 root root 4096 Jun 12 11:43 predicate drwxr-xr-x 2 root root 4096 Jun 12 11:43 runtime -rw-r--r-- 1 root root 837 Jun 12 11:43 runtime.go drwxr-xr-x 2 root root 4096 Jun 12 11:37 schema -rw-r--r-- 1 root root 6232 Jun 12 11:43 tx.go drwxr-xr-x 2 root root 4096 Jun 12 11:43 user -rw-r--r-- 1 root root 5649 Jun 12 11:43 user_create.go -rw-r--r-- 1 root root 2133 Jun 12 11:43 user_delete.go -rw-r--r-- 1 root root 3294 Jun 12 11:43 user.go -rw-r--r-- 1 root root 14277 Jun 12 11:43 user_query.go -rw-r--r-- 1 root root 7766 Jun 12 11:43 user_update.go
首先,创建一个新的 Client 来运行 Schema 迁移并与你的实体交互:
1 2 3 4 5 6 7 8 9 10 11 12 13 14 15 16 17 18 19 20 21 22 23 24 package mainimport ( "context" "log" "entdemo/ent" _ "github.com/mattn/go-sqlite3" ) func main () client, err := ent.Open("sqlite3" , "file:ent.db?cache=shared&_fk=1" ) if err != nil { log.Fatalf("failed opening connection to sqlite: %v" , err) } defer client.Close() if err := client.Schema.Create(context.Background()); err != nil { log.Fatalf("failed creating schema resources: %v" , err) } }
运行代码,即可完成 Schema 迁移。我们可以看到对应的数据库文件和表格:
1
2
3
4
5
6
# sqlite3 ent.db ".tables" users # sqlite3 ent.db ".schema" CREATE TABLE `users` (`id` integer NOT NULL PRIMARY KEY AUTOINCREMENT, `age` integer NOT NULL, `name` text NOT NULL DEFAULT ('unknown' )); CREATE TABLE sqlite_sequence(name,seq);
如下代码完成 User 的创建和查询:
1
2
3
4
5
6
7
8
9
10
11
12
13
14
15
16
17
18
19
20
21
22
23
24
25
func CreateUser (ctx context.Context, client *ent.Client) error ) { u, err := client.User. Create(). SetAge(30 ). SetName("a8m" ). Save(ctx) if err != nil { return nil , fmt.Errorf("failed creating user: %w" , err) } log.Println("user was created: " , u) return u, nil } func QueryUser (ctx context.Context, client *ent.Client) error ) { u, err := client.User. Query(). Where(user.Name("a8m" )). Only(ctx) if err != nil { return nil , fmt.Errorf("failed querying user: %w" , err) } log.Println("user returned: " , u) return u, nil }
1
2
2026/06/12 12:06:53 user was created: User(id =1, age=30, name=a8m) 2026/06/12 12:06:53 user returned: User(id =1, age=30, name=a8m)
注意,后面多次运行该示例,为了避免重复数据导致运行异常,每次可以先清理已有的数据库文件 。
接下来我们想要在 Schema 中声明到另一个实体的边(关系)。让我们创建2个名为 Car 和 Group 的额外实体,包含一些字段。我们使用 ent CLI 来生成初始 Schema:
1 go run -mod=mod entgo.io/ent/cmd/ent new Car Group
然后我们手动添加其余的字段:
entdemo/ent/schema/car.go
1 2 3 4 5 6 7 func (Car) return []ent.Field{ field.String("model" ), field.Time("registered_at" ), } }
entdemo/ent/schema/group.go
1 2 3 4 5 6 7 8 func (Group) return []ent.Field{ field.String("name" ). Match(regexp.MustCompile("[a-zA-Z_]+$" )), } }
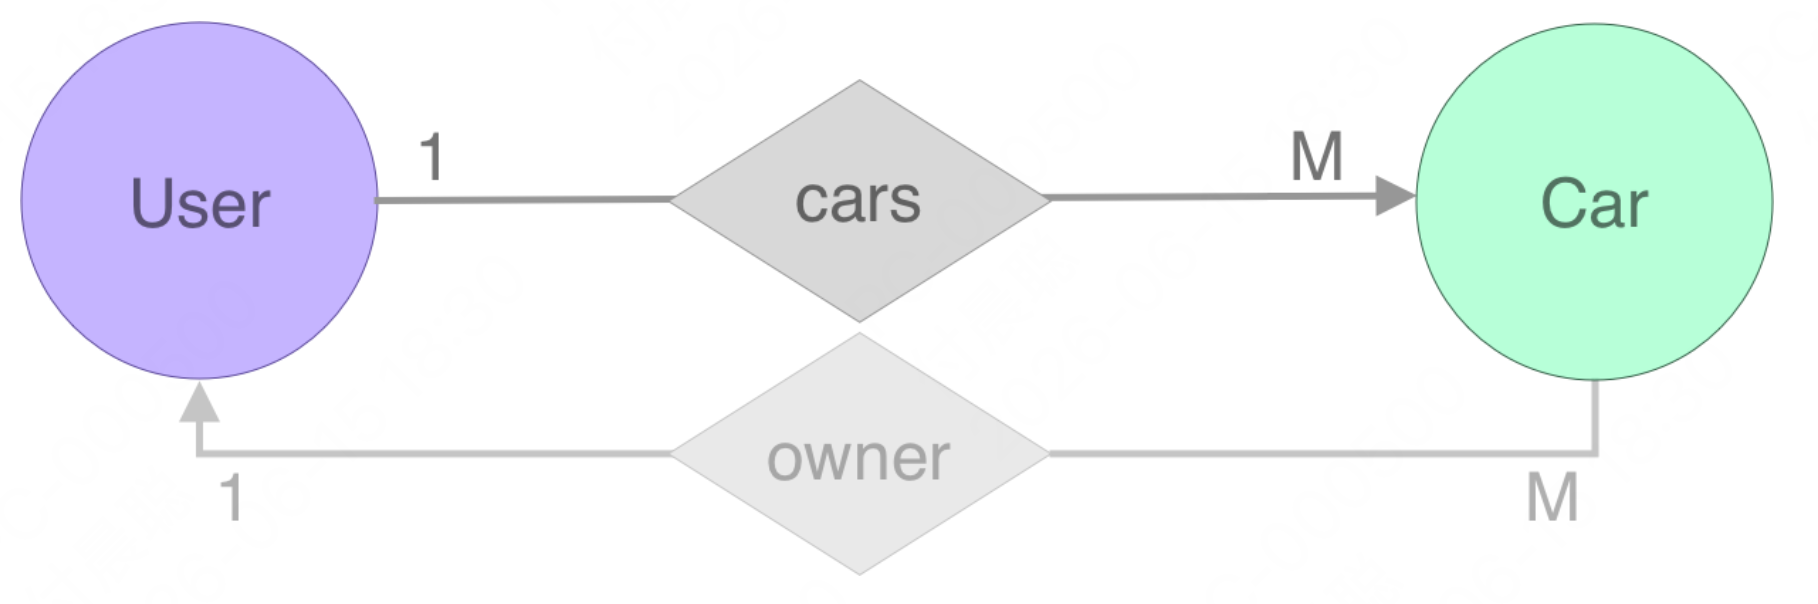
让我们定义我们的第一个关系:从 User 到 Car 的边,定义一个用户可以拥有1辆或多辆 汽车,但一辆汽车只有一个 所有者(一对多关系)。
让我们向 User Schema 添加 "cars" 边,并运行 go generate ./ent:
entdemo/ent/schema/user.go
1 2 3 4 5 6 func (User) return []ent.Edge{ edge.To("cars" , Car.Type), } }
我们继续示例,创建2辆汽车并将它们添加到用户。
entdemo/start.go
1
2
3
4
5
6
7
8
9
10
11
12
13
14
15
16
17
18
19
20
21
22
23
24
25
26
27
28
29
30
31
32
33
34
35
36
func CreateCars (ctx context.Context, client *ent.Client) error ) { tesla, err := client.Car. Create(). SetModel("Tesla" ). SetRegisteredAt(time.Now()). Save(ctx) if err != nil { return nil , fmt.Errorf("failed creating car: %w" , err) } log.Println("car was created: " , tesla) ford, err := client.Car. Create(). SetModel("Ford" ). SetRegisteredAt(time.Now()). Save(ctx) if err != nil { return nil , fmt.Errorf("failed creating car: %w" , err) } log.Println("car was created: " , ford) a8m, err := client.User. Create(). SetAge(30 ). SetName("a8m" ). AddCars(tesla, ford). Save(ctx) if err != nil { return nil , fmt.Errorf("failed creating user: %w" , err) } log.Println("user was created: " , a8m) return a8m, nil }
那么通过 cars 边(关系)进行查询呢?以下是方法:
entdemo/start.go
1
2
3
4
5
6
7
8
9
10
11
12
13
14
15
16
func QueryCars (ctx context.Context, a8m *ent.User) error { cars, err := a8m.QueryCars().All(ctx) if err != nil { return fmt.Errorf("failed querying user cars: %w" , err) } log.Println("returned cars:" , cars) ford, err := a8m.QueryCars(). Where(car.Model("Ford" )). Only(ctx) if err != nil { return fmt.Errorf("failed querying user cars: %w" , err) } log.Println(ford) return nil }
main 函数中使用如下代码:
1
2
3
4
5
6
7
8
9
u, err := CreateCars(context.Background(), client) if err != nil { log.Fatalf("failed create cars: %v" , err) } err = QueryCars(context.Background(), u) if err != nil { log.Fatalf("failed querying cars: %v" , err) }
运行结果如下:
1 2 3 4 5 6 7 2026/06/12 12:22:08 car was created: Car(id =1, model=Tesla, registered_at=Fri Jun 12 12:22:08 2026) 2026/06/12 12:22:08 car was created: Car(id =2, model=Ford, registered_at=Fri Jun 12 12:22:08 2026) 2026/06/12 12:22:08 user was created: User(id =1, age=30, name=a8m) 2026/06/12 12:22:08 returned cars: [Car(id =1, model=Tesla, registered_at=Fri Jun 12 12:22:08 2026) Car(id =2, model=Ford, registered_at=Fri Jun 12 12:22:08 2026)] 2026/06/12 12:22:08 Car(id =2, model=Ford, registered_at=Fri Jun 12 12:22:08 2026)
此时查看数据库表的结构:
1
2
3
4
5
6
# sqlite3 ent.db ".schema > " CREATE TABLE `cars` (`id` integer NOT NULL PRIMARY KEY AUTOINCREMENT, `model` text NOT NULL, `registered_at` datetime NOT NULL, `user_cars` integer NULL, CONSTRAINT `cars_users_cars` FOREIGN KEY (`user_cars`) REFERENCES `users` (`id`) ON DELETE SET NULL); CREATE TABLE sqlite_sequence(name,seq); CREATE TABLE `groups` (`id` integer NOT NULL PRIMARY KEY AUTOINCREMENT, `name` text NOT NULL); CREATE TABLE `users` (`id` integer NOT NULL PRIMARY KEY AUTOINCREMENT, `age` integer NOT NULL, `name` text NOT NULL DEFAULT ('unknown'));
cars 表有一个 user_cars 字段,这是一个外键,指向 users 表
假设我们有一个 Car 对象,我们想要获取它的所有者,即这辆汽车所属的用户。为此,我们有另一种类型的边叫做 反向边,使用 edge.From 函数定义。新创建的边在图中是半透明的,以强调我们不会在数据库中创建另一条边 。它只是对实际边(关系)的反向引用。
让我们向 Car Schema 添加一个名为 owner 的反向边,引用它到 User Schema 中的 cars 边,并运行 go generate ./ent。
1 2 3 4 5 6 7 8 9 10 11 func (Car) return []ent.Edge{ edge.From("owner" , User.Type). Ref("cars" ). Unique(), } }
在主程序中查询反向边:
1 2 3 4 5 6 7 8 9 10 11 12 13 14 15 16 17 func QueryCarUsers (ctx context.Context, a8m *ent.User) error { cars, err := a8m.QueryCars().All(ctx) if err != nil { return fmt.Errorf("failed querying user cars: %w" , err) } for _, c := range cars { owner, err := c.QueryOwner().Only(ctx) if err != nil { return fmt.Errorf("failed querying car %q owner: %w" , c.Model, err) } log.Printf("car %q owner: %q\n" , c.Model, owner.Name) } return nil }
运行结果如下:
1 2 3 4 ...... 2026/06/15 18:38:24 car "Tesla" owner: "a8m" 2026/06/15 18:38:24 car "Ford" owner: "a8m"
数据库表结构和前面的例子一致:
1 2 3 4 5 CREATE TABLE `cars` (`id ` integer NOT NULL PRIMARY KEY AUTOINCREMENT, `model` text NOT NULL, `registered_at` datetime NOT NULL, `user_cars` integer NULL, CONSTRAINT `cars_users_cars` FOREIGN KEY (`user_cars`) REFERENCES `users ` (`id `) ON DELETE SET NULL); CREATE TABLE sqlite_sequence(name,seq ); CREATE TABLE `groups ` (`id ` integer NOT NULL PRIMARY KEY AUTOINCREMENT, `name` text NOT NULL); CREATE TABLE `users ` (`id ` integer NOT NULL PRIMARY KEY AUTOINCREMENT, `age` integer NOT NULL, `name` text NOT NULL DEFAULT ('unknown' ));
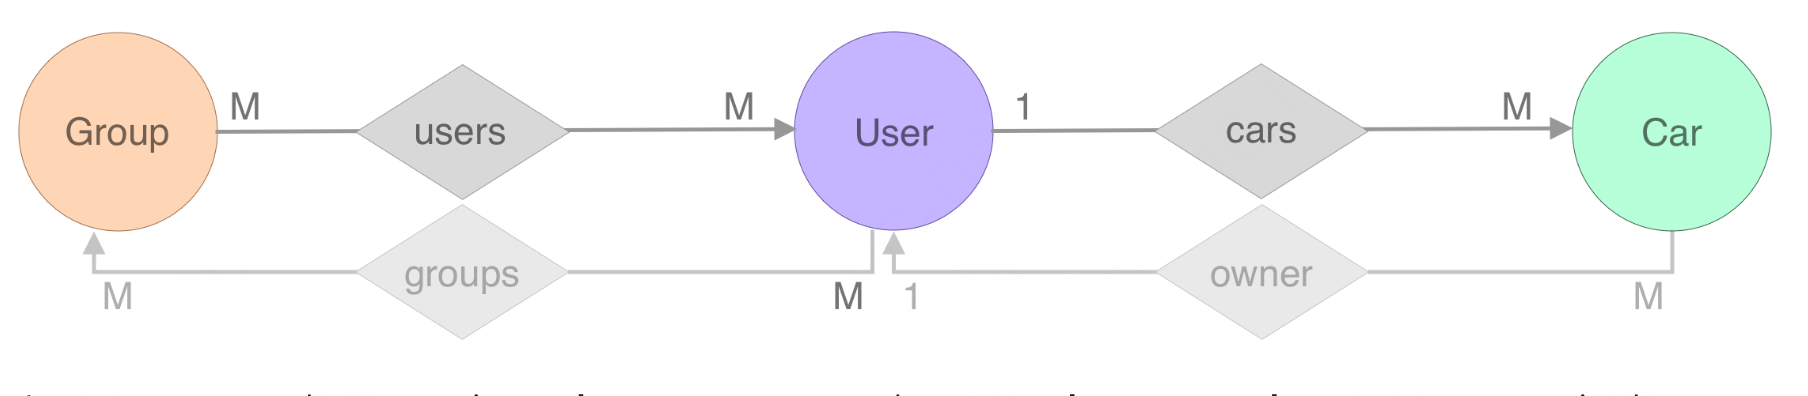
我们继续示例,创建用户和组之间的 M2M(多对多)关系。如图所示,每个组实体可以拥有多个 用户,一个用户可以连接到多个 组;一个简单的 多对多 关系:
在上图中,Group Schema 是 users 边(关系)的所有者,User 实体有一个名为 groups 的反向边/反向引用到这个关系。让我们在 Schema 中定义这个关系:
1 2 3 4 5 6 7 8 func (Group) return []ent.Edge{ edge.To("users" , User.Type), } }
1 2 3 4 5 6 7 8 9 10 11 12 func (User) return []ent.Edge{ edge.To("cars" , Car.Type), edge.From("groups" , Group.Type). Ref("users" ), } }
我们在 Schema 目录运行 ent 以重新生成资源。
运行我们的第一个图遍历,我们需要生成一些数据(节点和边,或者换句话说,实体和关系)。让我们使用框架创建以下图:
1
2
3
4
5
6
7
8
9
10
11
12
13
14
15
16
17
18
19
20
21
22
23
24
25
26
27
28
29
30
31
32
33
34
35
36
37
38
39
40
41
42
43
44
45
46
47
48
49
50
51
52
53
54
55
56
57
58
59
60
61
62
63
64
65
66
func CreateGraph (ctx context.Context, client *ent.Client) error { a8m, err := client.User. Create(). SetAge(30 ). SetName("Ariel" ). Save(ctx) if err != nil { return err } neta, err := client.User. Create(). SetAge(28 ). SetName("Neta" ). Save(ctx) if err != nil { return err } err = client.Car. Create(). SetModel("Tesla" ). SetRegisteredAt(time.Now()). SetOwner(a8m). Exec(ctx) if err != nil { return err } err = client.Car. Create(). SetModel("Mazda" ). SetRegisteredAt(time.Now()). SetOwner(a8m). Exec(ctx) if err != nil { return err } err = client.Car. Create(). SetModel("Ford" ). SetRegisteredAt(time.Now()). SetOwner(neta). Exec(ctx) if err != nil { return err } err = client.Group. Create(). SetName("GitLab" ). AddUsers(neta, a8m). Exec(ctx) if err != nil { return err } err = client.Group. Create(). SetName("GitHub" ). AddUsers(a8m). Exec(ctx) if err != nil { return err } log.Println("The graph was created successfully" ) return nil }
现在我们有了包含数据的图,我们可以在上面运行几个查询:
获取组名为 “GitHub” 的所有用户汽车:
1
2
3
4
5
6
7
8
9
10
11
12
13
func QueryGithub (ctx context.Context, client *ent.Client) error { cars, err := client.Group. Query(). Where(group.Name("GitHub" )). QueryUsers(). QueryCars(). All(ctx) if err != nil { return fmt.Errorf("failed getting cars: %w" , err) } log.Println("cars returned:" , cars) return nil }
更改上面的查询,使遍历的源是用户 Ariel :
1
2
3
4
5
6
7
8
9
10
11
12
13
14
15
16
17
18
19
20
21
22
23
24
25
26
func QueryArielCars (ctx context.Context, client *ent.Client) error { a8m := client.User. Query(). Where( user.HasCars(), user.Name("Ariel" ), ). OnlyX(ctx) cars, err := a8m. QueryGroups(). QueryUsers(). QueryCars(). Where( car.Not( car.Model("Mazda" ), ), ). All(ctx) if err != nil { return fmt.Errorf("failed getting cars: %w" , err) } log.Println("cars returned:" , cars) return nil }
获取所有有用户的组(使用附带谓词查询):
1
2
3
4
5
6
7
8
9
10
11
12
func QueryGroupWithUsers (ctx context.Context, client *ent.Client) error { groups, err := client.Group. Query(). Where(group.HasUsers()). All(ctx) if err != nil { return fmt.Errorf("failed getting groups: %w" , err) } log.Println("groups returned:" , groups) return nil }
运行结果:
1
2
3
4
2026 /06 /16 18 :27 :07 The graph was created successfully2026 /06 /16 18 :27 :07 cars returned: [Car(id=3 , model=Tesla, registered_at=Tue Jun 16 18 :27 :07 2026 ) Car(id=4 , model=Mazda, registered_at=Tue Jun 16 18 :27 :07 2026 )]2026 /06 /16 18 :27 :07 cars returned: [Car(id=3 , model=Tesla, registered_at=Tue Jun 16 18 :27 :07 2026 ) Car(id=5 , model=Ford, registered_at=Tue Jun 16 18 :27 :07 2026 )]2026 /06 /16 18 :27 :07 groups returned: [Group(id=1 , name=GitLab) Group(id=2 , name=GitHub)]
Ent 提供两种运行 Schema 迁移的方法:自动迁移 和 版本化迁移 。以下是每种方法的简要概述:
使用自动迁移,用户可以使用以下 API 保持数据库 Schema 与在生成的 SQL Schema ent/migrate/schema.go 中定义的 Schema 对象对齐:
1
2
3
if err := client.Schema.Create(ctx); err != nil { log.Fatalf("failed creating schema resources: %v" , err) }
这种方法主要用于原型设计、开发或测试。因此,对于关键的生产环境,建议使用版本化迁移 方法。通过使用版本化迁移,用户可以事先知道将对数据库应用哪些更改,并根据需要轻松调整它们。
自动迁移 不同,版本化迁移 方法使用 Atlas 自动生成一组包含必要 SQL 语句的迁移文件,以迁移数据库。这些文件可以编辑以满足特定需求,并使用现有的迁移工具如 Atlas、golang-migrate、Flyway 和 Liquibase 应用。此方法的 API 涉及两个主要步骤。
1
2
3
4
atlas migrate diff migration_name \ --dir "file://ent/migrate/migrations" \ --to "ent://ent/schema" \ --dev-url "sqlite://file?mode=memory&_fk=1"
1
2
3
atlas migrate apply \ --dir "file://ent/migrate/migrations" \ --url "sqlite://file.db?_fk=1"
这篇文章我们快速学习了 ent 库的基本使用方法,介绍了如何使用 ent 构建数据库模型,如何创建和查询数据。我们还介绍了如何在生产环境中使用 ent 迁移数据库 Schema 的两种方法:自动迁移和版本化迁移。